Investigation Task
The EyesOnIt Investigation task lets you search recorded footage using the index that EyesOnIt builds while it monitors your cameras. Rather than scrubbing through hours of video manually, you describe what you are looking for and EyesOnIt shows you the moments that match. Open the Investigation task from the Security Desk task list.
Page layout
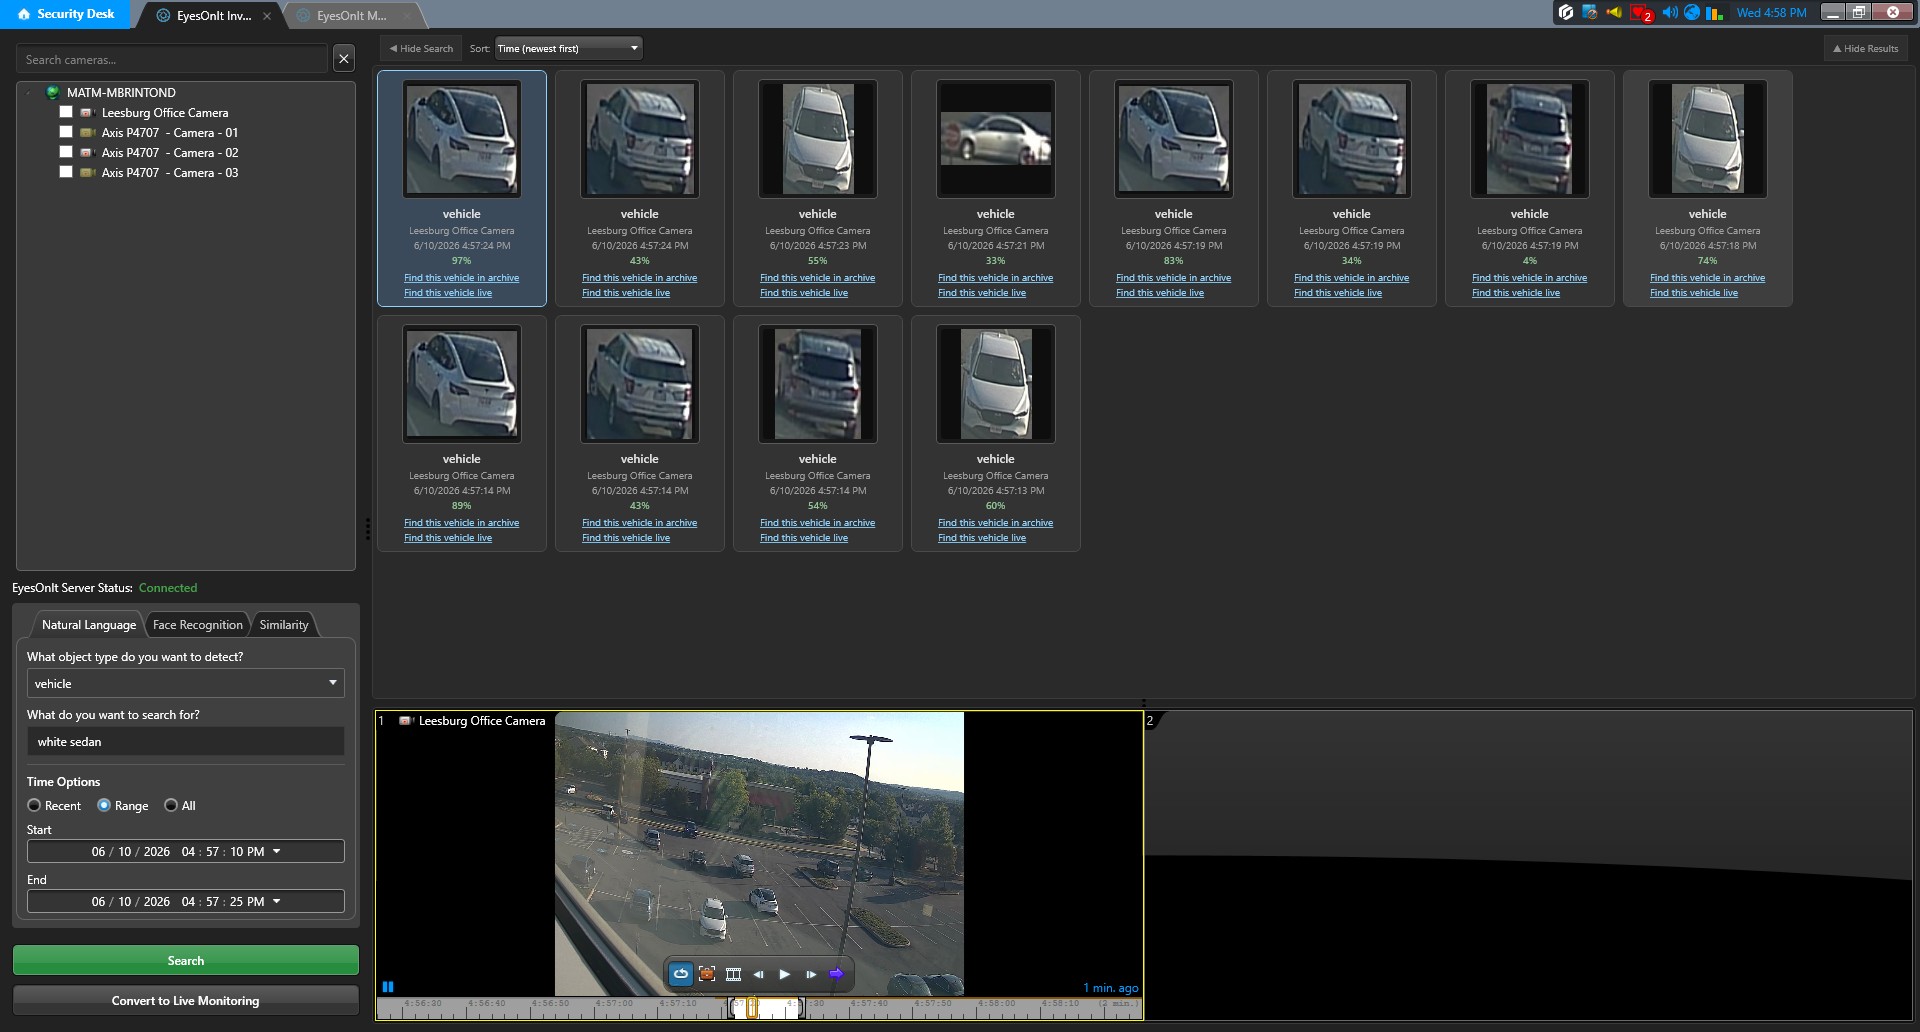
The page has four areas that work together:
- Camera panel (upper-left side): a searchable tree of cameras where you choose which cameras to include in the search.
- Status indicator (below Camera panel): A text indicator showing whether Genetec is connected to EyesOnIt
- Search options (below search indicator): Where you set search options like the search mode and time options
- Results grid (upper main area): shows the detections that match your search, with thumbnails, timestamps, and confidence scores.
- Tile player (lower main area): a two-tile video player where you can load and review the footage surrounding each detection.
You can use the toggle buttons at the top of the main area to collapse the search panel or the results grid if you want more space for the video tiles.
Selecting cameras
Use the search box at the top of the camera panel to filter the list by name. Check the cameras you want to include — you can select as many as you need, which is useful when you want to trace an object's path across multiple locations.
Search modes
The search panel lets you switch between three modes depending on how you want to describe what you are looking for.
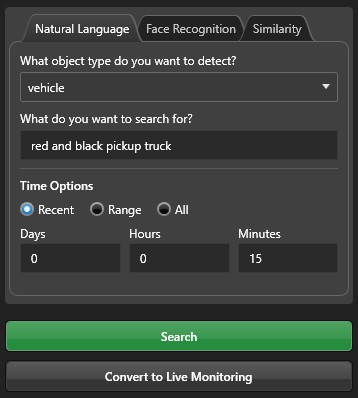
Natural Language
Natural language search is often the quickest way to get started. You describe what you are looking for in plain text and EyesOnIt finds matching detections.
| Field | Description |
|---|---|
| Object Type | The broad category to search within: person, vehicle, animal, or bag. |
| Object Description | A description of what you are looking for — for example, "person wearing a red jacket" or "white delivery van". |
Face Recognition
Face recognition search finds appearances of a specific person or any member of a group.
| Field | Description |
|---|---|
| Match Type | Person to search for a specific enrolled individual, or Group to search for any enrolled person belonging to a group. |
| Name | The person or group name. Type to see matching suggestions from your enrolled database, and select one before running the search. |
Image Similarity
Image similarity lets you search using a picture rather than words. This is particularly useful when you have captured an image of someone from an earlier incident — even if they are not enrolled — and want to find other appearances of the same person or vehicle.
Drag an image file onto the drop zone or click Browse to choose a file from disk. EyesOnIt will return detections that are visually similar to the reference image.
Time filters
All three search modes support the same time scoping options, which help narrow results to the period you care about:
- Recent — the last N days, hours, and/or minutes from right now.
- Range — between a specific start date/time and end date/time.
- All — all indexed results regardless of when they occurred.
Searching
Once you have selected your cameras and filled in the search parameters, click Search. EyesOnIt queries the index and populates the results grid with matching detections.
Working with results
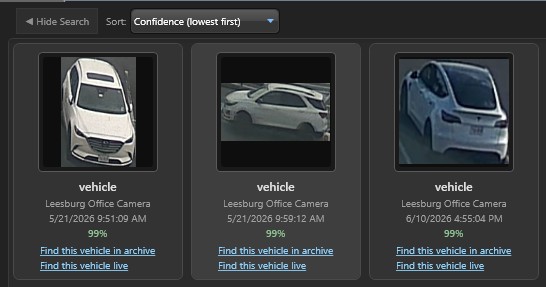
The results grid shows one tile per detection. Each tile includes details that are specific to the type of search performed.
Viewing video
Double-click any result tile to load the video at that detection's timestamp in the next available video tile in the player below. The video tile player holds up two clips at a time, making it easy to compare footage from different detections side by side. Use the standard player controls within each video tile to play, pause, and scrub through the footage.
Following up on a result
Each result row includes two action links that let you keep investigating without starting from scratch:
- Find this <object type> in archive — starts a new Investigation search using this detection as a similarity reference, finding other archive appearances of the same object.
- Find this <object type> live — opens the Monitoring task and starts a live search seeded with this detection, so you can watch for the same person or vehicle going forward.
Converting to Live Monitoring
If your investigation leads you to want live surveillance instead of archive search, the Convert to Live Monitoring button at the bottom of the camera panel opens the Monitoring task with your current camera selection and search parameters already filled in.